
tl;dr (shut up and give me the code)
You can find the final version of the code down below.
When I’m drafting something up or even creating an entire custom Shopify theme, I’m often asked to include an Instagram feed.
While installing some app is the go-to answer for many developers, it is not without its drawbacks;
- It hurts site load speed
- It’s usually inconsistent with the rest of the theme
- Advanced customization is usually not possible
- You can’t customize directly from the theme editor
In this short guide, I’m going to share how I usually do it while avoiding the above drawbacks.
Step 1
Create an account at behold.so and link it to your business’s Instagram account
Step 2
Find any section that remotely resembles an Instagram feed and try to create a dummy feed manually

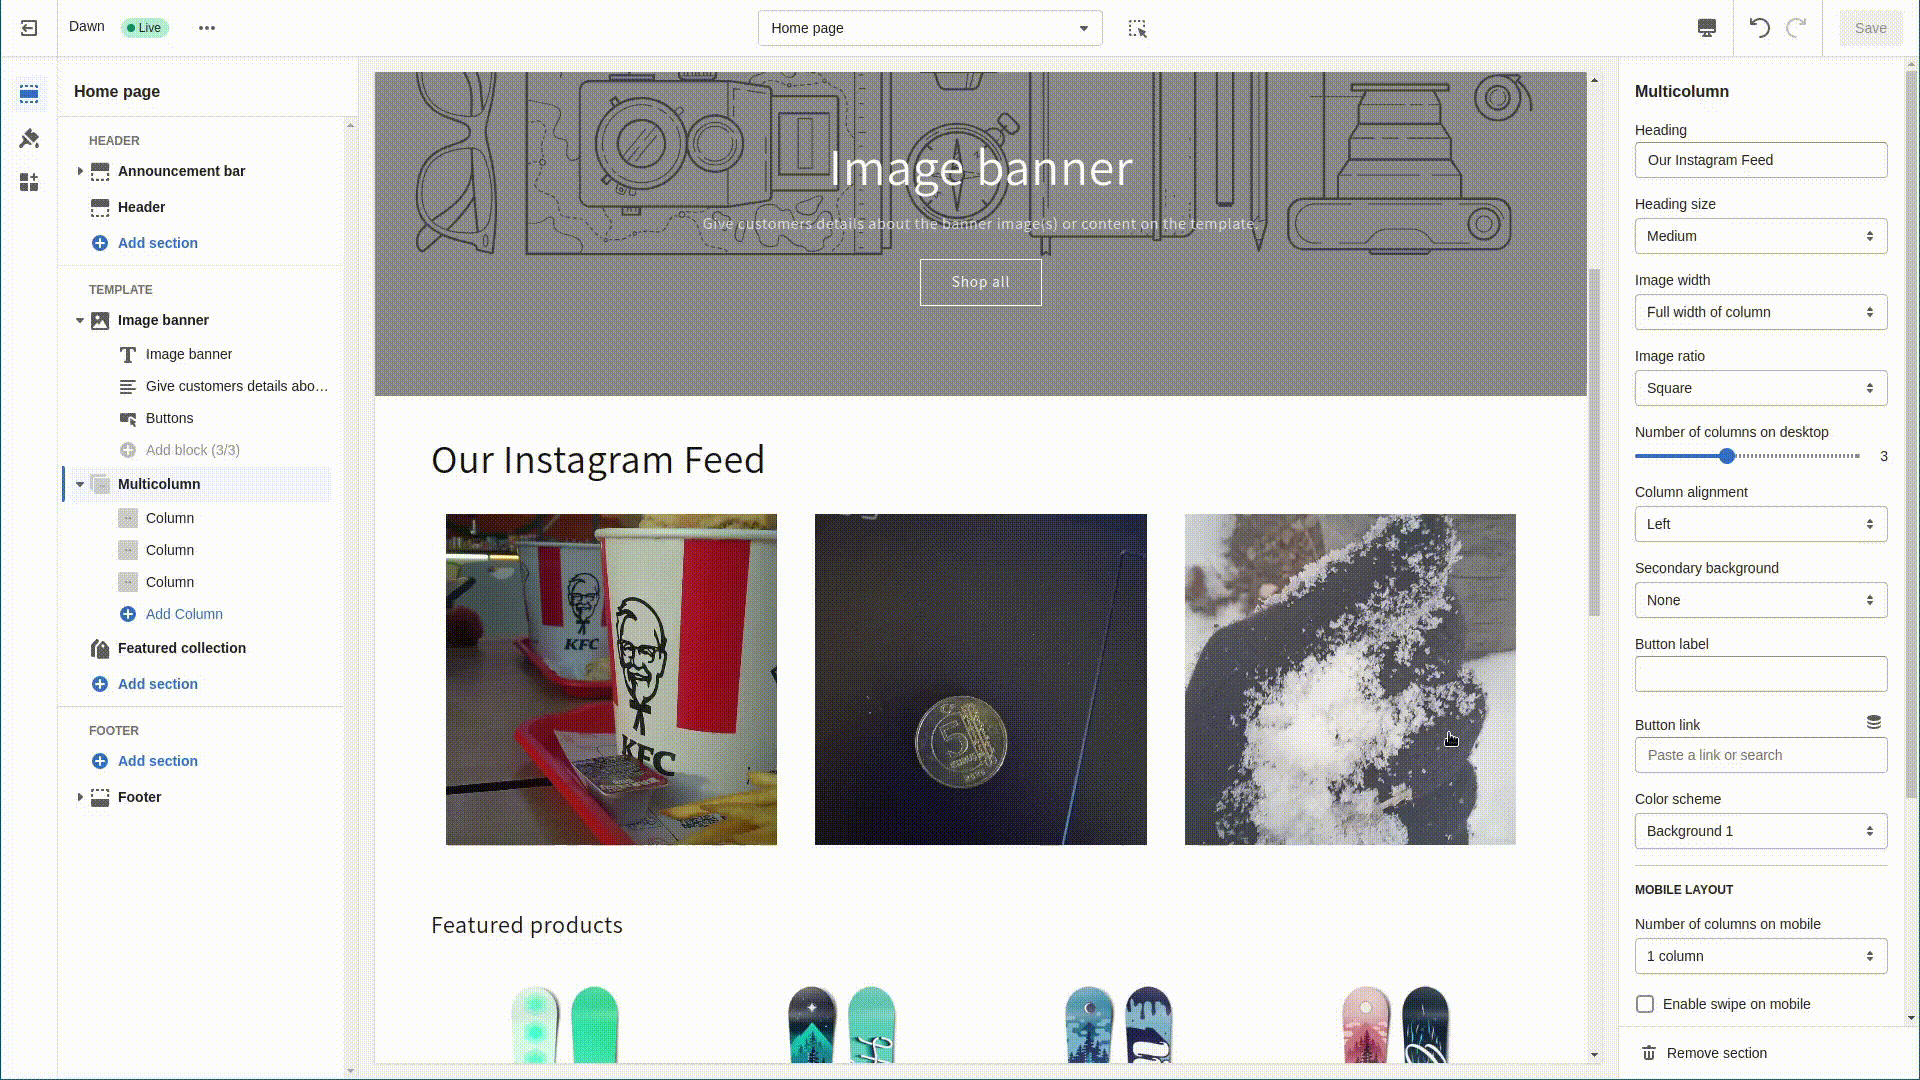
Using the default Shopify 2.0 theme (Dawn), I’m able to manually create a dummy Instagram feed.

Step 3a
Find the section’s Liquid code in the online code editor. In my case, it’s in
sections/multicolumn.liquidMake a copy of the file and name it something descriptive like
sections/insta-feed.liquidBe sure to close the original file as we won’t need it anymore.
Step 3b
We need to change 2 things about the new “insta-feed” section so that we can later add it through the editor
Towards the end of the file, you’ll find a part similar to this
{% schema %}
{

 "name": "t:sections.multicolumn.name",
 ...
}
Change the section name like this
{% schema %}
{

 "name": "Instagram Feed",
 ...
}
We’re almost there, we just need to make the same exact change somewhere else, so scroll all the way down to the closing schema tag, which may look something like this
  ...
  "presets":
    {
      "name": "t:sections.multicolumn.presets.name",
      "blocks": [
        {
          "type": "column"
        },
        {
          "type": "column"
        },
        {
          "type": "column"
        }
      ]
    }
  ]
}
{% endschema %}
And again… change the name of the section to “Instagram feed”
 ..
  "presets":
    {
      "name": "Instagram Feed",
      "blocks": [
        {
          "type": "column"
        },
        {
          "type": "column"
        },
        {
          "type": "column"
        }
      ]
    }
  ]
}
{% endschema %}
Step 4 (challenging)
Find the Liquid filter or HTML image tag responsible for rendering each image
Tip: It’s usually a few lines after the main blocks loops
{% for block in section.blocks %}
  ...
  {{ block.settings.image | image_url ... }}
  ...
{% endfor %}
Step 5
Add an extra CSS class like “insta-photo” to your image, either directly to an
<img ...>tag, or indirectly through the image_url Liquid filter’s parameters
{{ block.settings.image | image_url: ..., class: 'insta-photo' }} Step 6
Back to behold.so, find your Feed URL and keep it on hand for the next step
Step 7
Copy this short snippet, replacing YOUR_URL_HERE with your Feed URL, leaving the surrounding quotes as is
<script>
  function loadInstaFeed() {
    fetch('YOUR_URL_HERE').then(data => data.json()).then(photos => {
      document.querySelectorAll('.insta-photo').forEach((p, ix) =>
      p.insertAdjacentHTML('afterend', `<img src="${photos[ix].mediaUrl}"
                                             class="${p.className}"
                                             id="${p.id}">`
      ) || p.remove())  })}

  loadInstaFeed()
</script>
And paste it just above the opening schema tag (should be towards the end of your file)
👇


{% schema %}
...
🎉 Voila! You did it!
Now you’re going to want to improve it just a little.
1. Making it more editor friendly
Try rearranging the order of your feed, notice how the images disappear? Let’s fix it by telling Shopify to reload our images when we change things in the editor
Add the following just above
{% if request.design_mode %}
  window.addEventListener('shopify:section:load', loadInstaFeed)
{% endif %}
Your code should end up looking like this and your feed will now update along
<script>
  function loadInstaFeed() {
    fetch('YOUR_URL_HERE').then(data => data.json()).then(photos => {
      document.querySelectorAll('.insta-photo').forEach((p, ix) =>
      p.insertAdjacentHTML('afterend', `<img src="${photos[ix].mediaUrl}"
                                             class="${p.className}"
                                             id="${p.id}">`
      ) || p.remove())  })}

  loadInstaFeed()

  {% if request.design_mode %}
    window.addEventListener('shopify:section:load', loadInstaFeed)
  {% endif %}
</script>
2. Making the images clickable
Now let’s make the images link to their respective Instagram posts
On line 5, right after the opening img tag
p.insertAdjacentHTML('afterend', `<img 👈 src="...Add the following
onclick="window.open('${photos[ix].permalink}', '_blank')"Which should make line 5 look like this
  p.insertAdjacentHTML('afterend',
    `<img onclick="window.open('${photos[ix].permalink}', '_blank')"
          src="${photos[ix].mediaUrl}"
          class="${p.className}" id="${p.id}">`) || p.remove())
3. Making the images feel and look more clickable
Clicking should now work as expected, but it doesn’t quite feel right, does it?
Add the following just after the closing script tag
<style>
  .insta-photo {
    cursor: pointer;
    transition: .2s ease;
  }


  .insta-photo:hover {
    opacity: 0.8;
    transition: .2s ease;
  }
</style>
🥳 Hooray! We’re done.
We now have a fully working, custom Instagram feed that integrates seamlessly with the rest of your sections.
Assuming you’ve followed steps 3a and 3b, you will now find a section called “Instagram Feed” to add to your page.
Features
- The new Instagram section is treated like any other section in the theme and is thus just as customizable
- No extra assets (JS or CSS) were loaded in
- The section integrates smoothly with the Shopify theme editor, making it feel natural to move around and manipulate
- The code is highly extensible to including others features like post title, date, likes, etc.
- The section is reusable and will most likely work on any theme, especially official Shopify themes built on top of the Dawn 2.0 theme
Some caveats to be aware of
Since this is a “quick & dirty” Instagram feed, it is also not without its drawbacks
- Using behold.so, your feed has a limit of 6 posts! Follow me for an upcoming follow-up guide that uses the Instagram API to avoid this limit.
- Although my code tries to be as compatible as possible by not assuming things about the way your original section is structured, it might still end up looking off on some themes and might require some extra tweaks!
Full Code Snippet
Be sure to give your images a class like “insta-photo”
<script>
  function loadInstaFeed() {
    fetch('YOUR_URL_HERE').then(data => data.json()).then(photos => {
      document.querySelectorAll('.insta-photo').forEach((p, ix) =>
        p.insertAdjacentHTML('afterend',  `<img src="${photos[ix].mediaUrl}" class="${p.className}" id="${p.id}">`) || p.remove()) })}

  loadInstaFeed()

  {% if request.design_mode %}
    window.addEventListener('shopify:section:load', loadInstaFeed)
  {% endif %}
</script>

<style>
  .insta-photo {
    cursor: pointer;
    transition: .2s ease;
  }

  .insta-photo:hover {
    opacity: 0.8;
    transition: .2s ease;
  }
</style>