If you run a Shopify store, you might find yourself having to password protect a page you’d like to reserve only for specific customers.
Perhaps it’s a pricing page for collaborators, or exclusive business updates you’d like to share with a select few high-value customers.
If you found this article by google something like “How to password protect a page in Shopify”, expecting a built-in Shopify feature, you’d be disappointed to find out that most results refer you to some Shopify app that provides this seemingly primitive function.
Paid apps like Locksmith might be useful if your store relies heavily on password-protection; where you’re trying to password-protect static pages, product pages and other resources, all at once, in a centralized interface.
As a developer always looking to hack at Shopify, I propose a much simpler, performance-optimized, secure alternative, that will cost you nothing, and get the job done effectively.
The problem
So you created your page in Online Store > Pages, customized it in the editor, and can now access it at https://your-store.com/pages/my-secret-page
Note! It is required that you assign this page to its own unique template, so create that in the code editor and assign it, if you haven’t already.
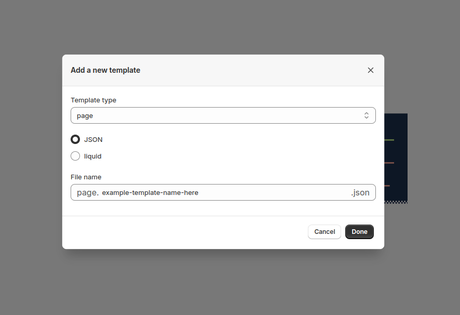
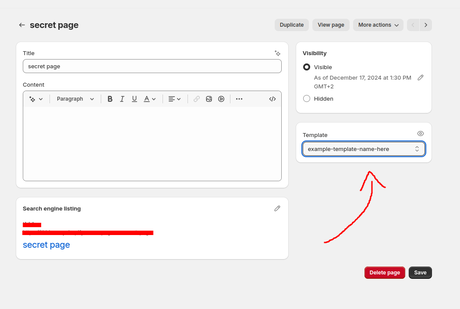
But now you’d like to password-protect this page and share the password to only a select few via email, etc
Let’s dig into the code…
The concept
This novelty method involves the tricky use of Shopify’s collection filters and how one is able to indirectly access URL parameters in Liquid!!
If you read that sentence correctly, you may realize that such a thing could have many more advanced applications than password protection, but I digress.
In this article, I’m simply going to cover the application of this method to implement password-protection for Shopify pages.
Step 1
Change the page’s SEO handle to match the template suffix exactly.
If you’re an SEO-savvy person, you might hate this step, but if you think about it, this password-protected page should not be advertised to search engines anyway, and you can always set seo.hidden = 1 to stop search engines from indexing this page
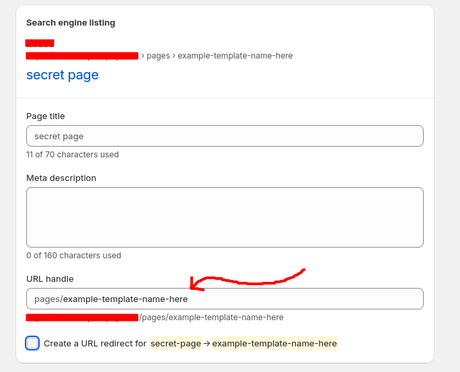
This now takes your page from having THIS url
https://your-store.com/pages/my-secret-page
to THIS url
https://your-store.com/pages/example-template-name-here
Which is obviously less clear, but again, the handle shouldn’t matter
Step 2
Create a “counterpart” collection template, following the exact naming of your page’s template
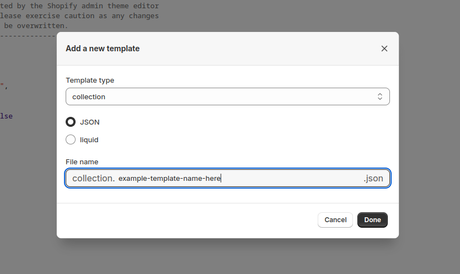
This collection template should be treated as a mere duplicate of or counterpart to the page template, with the only difference being the filename.
💡 The page template will always be something like page.custom-handle-here.json, and the counterpart collection template collection.custom-handle-here.json
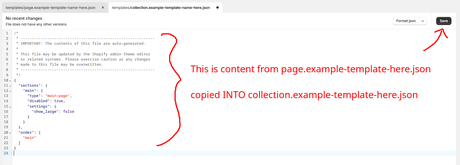
Make sure the content between the 2 templates, is ALWAYS THE SAME, after making any change to the page in the customizer, make sure to always copy the code from the page template to the counterpart collection template in the code editor.
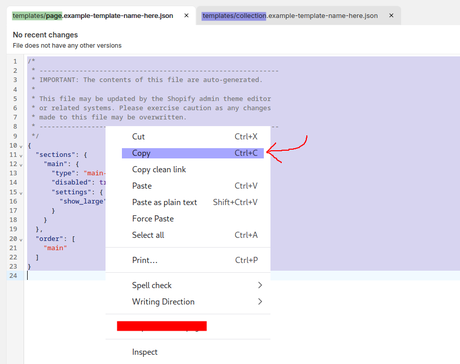
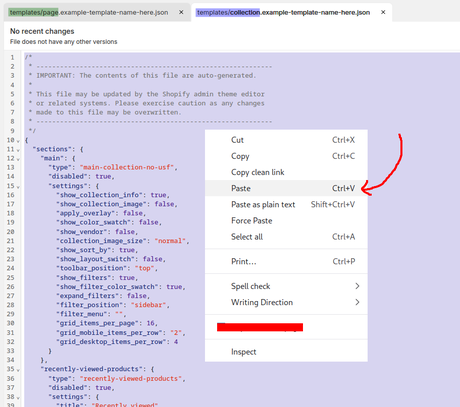
And of course, don’t forget to save
Step 3
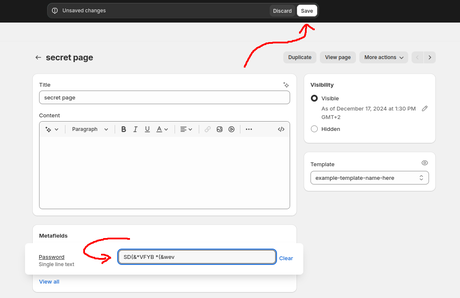
Create a page metafield definition, where you’ll be setting the password for each respective page
💡 You will find the page metafield definitions in Settings > Custom Data > Metafield definitions > Pages, where you will click Add definition
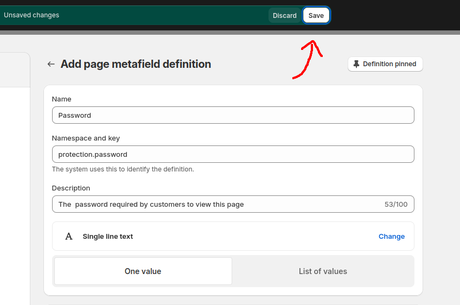
And again, don’t forget to save
At this point, you can set the password for the page you created
Step 4
This step involves creating 2 new Liquid sections in the code editor.
💡 At this point, we haven’t touched any aspect of design when it comes to the password pages that will be viewed by customers.
The design of the 2 new Liquid sections we’re about to create is completely up to you and your store’s theme.
If you’re using Prestige for example, you might reuse the code in layout/password.liquid for its consistent design with the rest of the site.
But for illustrative purposes, I will use a barebones un-designed version of HTML
So let’s create the first file in sections/ask-password.liquid, this will be what customers see when asked for a password
<form method="GET" action="/collections/all">
  <input type="hidden" name="view" value="{{ template.suffix }}" />
  <input type="password" name="filter.p.auth" value="" />
  <button type="submit">Enter</button>
</form>
Now let’s create the second file in sections/wrong-password.liquid, this will be what customers see if they used the wrong password
<form method="GET" action="/collections/all">
  <p>Wrong Password</p>
  <input type="hidden" name="view" value="{{ template.suffix }}" />
  <input type="password" name="filter.p.auth" value="" />
  <button type="submit">Enter</button>
</form>
Step 5
This step involves changing a line in layout/theme.liquid
In the code editor, find the following in layout/theme.liquid
...

{{ content_for_layout }}

...
Where … indicates content before and after what we’re looking for.
Now replace {{ content_for_layout }} with the following
...

{%- if page != blank and page.metafields.protection.password != blank -%}
  {% section 'ask-password' %}
{%- else -%}
  {%- if collection.filters.first.url_to_remove contains '?filter.p.auth' -%}
    {%- assign page = pages[template.suffix] -%}
    {%- assign auth = page.metafields.protection.password | url_encode -%}

    {%- assign userauth = collection.filters.first.url_to_remove | split: 'filter.p.auth=' | last | split: '&view=' | first -%}

    <script>
      window.history.pushState({}, "", '/pages/{{ page.template_suffix }}');
    </script>

    {%- if auth == userauth -%}
      {{ content_for_layout }}
    {%- else -%}
      {% section 'wrong-password' %}
    {%- endif -%}

  {%- else %}
    {{ content_for_layout }}
  {%- endif %}
{%- endif -%}

...
And that’s it! You can now access your page at https://your-store.com/pages/example-template-name-here, and upon entering the correct password, gain access to the pages content, otherwise you get a “Wrong password” error message.
Perks
Although this method relies on your ability to navigate and edit code, it has its functional perks and advantages like
- The solution is super reliable by nature, and cannot be easily cracked
I invite you to prove me wrong or share findings - The customizer will work like normal and you can still make changes as usual
- The password check happens entirely server-side, which prevents anyone from attempting to reverse-engineer front-end code to bypass the page
- The passing of ?p.filter.auth is never expected to break as it’s a core part of Shopify’s collection filter logic
- The solution is very performant, and produces no performance overhead
- It requires no third-party code, and everything is managed entirely by you
- It incorporates Shopify metafields to store and retrieve passwords
- The solution can be re-used for an unlimited number of pages
Advanced Tweaks
When implementing this on live stores, I usually do a bit more for my clients, like
- Including Shopify’s Liquid sha256 filter to prevent the password appearing in plain text in network requests
- Implementing additional code to allow the SEO handle to stay as is, irrespective of the template suffix
- Hiding the page from SEO via robots.txt or as mentioned, seo.hidden = 1
Caveats
A solution of this nature is bound to have some caveats like
- The need to consistently update the collection template counterpart after every page template update in the customizer
- The SEO handle MUST align with the template suffix (at least in the barebone version above)
Conclusion
I hope you found this article useful, and if you think about it, formulating such a hackky solution is only possible after years of experience with the Shopify platform.
If you have a unique problem or requirement that should ideally be created on the Shopify platform, you are free to contact me at any time, and I’ll be sure to respond :)
